When a user fills out a form, the more data that is available and prefilled onto the form, the less work the user must do. Generally a form is prefilled with client data that aligns to specific roles (Owner 1, Owner 2, Beneficiary 1, Contingent Beneficiary 1, etc.). Alternative Data Buttons can be implemented to give users the ability to select any client data that has been sent to a form, and prefill fields with it. In other words, Alternate Data Buttons lets users change field data on the fly, just by selecting a client's name.
...
The user can more easily switch people into different roles
The user can fill in non-pre-filled data blocks or empty fields, with two clicks
The user can select alternate records that were not used to prefill any fields (e.g. extra addresses).
There are two types of Alternate Alternative Data Buttons in the Quik! Forms Engine: Default Alt Data Buttons, and Custom Alt Data Buttons
Default Alt Data Button & Pop-Up
...
Custom Alt Data Button & Pop-Up
...
Their differences are described below.
Configuring Custom Alternative Data Buttons
Custom Alternate Alternative Data Buttons are not on by default, and must be configured with a set of properties. There is a method in the QuikFormsEngine class called AddCustomAltDataButton that adds a Custom Button for a certain field. This method takes an object of class CustomAltButton as parameter. Its properties and associated classes are described In the table below. NOTE: Custom Alternative Data Buttons only work with text fields–not checkboxes or radio buttons.
Objects Involved
Object Name | Description | Properties |
|---|---|---|
CustomAltButton | Object passed to the QuikFormsEngine method |
|
CustomAltButtonGroup | Object that represents an option in the popup's DropDownList. The group contains all data related to one record. |
|
CustomAltButtonField | Object that contains data related to a single field associated to the group |
|
Sample Use Case
Suppose we want to add a custom button next to the field 1own.H.Addr123, that will allow the user to populate all Home Address related fields. And let's say the related fields are:
1own.H.Addr123
1own.H.Addr4
1own.H.City
1own.H.State
1own.H.Zip
1own.H.Country
The way to accomplish this is by calling the QuikFormsEngine's AddCustomAltDataButton method, and passing a CustomAltButton object that will be described below. Here's a sample code snippet:
VB.NET
Sample Code
| Code Block | ||
|---|---|---|
| ||
objQFE.AddCustomAltDataButton(New CustomAltButton() With {
                                          .FieldName = "1own.H.Addr123",
                                          .Title = "Select your Home Address",
                                          .Groups = New List(Of CustomAltButtonGroup) From {
                                               New CustomAltButtonGroup() With {
                                                  .GroupLabel = "Account 1",
                                                  .Fields = New List(Of CustomAltButtonField) From {
                                                  New CustomAltButtonField() With {
                                                          .Name = "1own.H.Addr123",
                                                          .Value = "Rivadavia 2134"
                                                      },
                                                      New CustomAltButtonField() With {
                                                          .Name = "1own.H.Addr4",
                                                          .Value = "Rincon 20"
                                                      },
                                                      New CustomAltButtonField() With {
                                                          .Name = "1own.H.City",
                                                          .Value = "CABA"
                                                      },
                                                      New CustomAltButtonField() With {
                                                          .Name = "1own.H.State",
                                                          .Value = "BA"
                                                      },
                                                      New CustomAltButtonField() With {
                                                          .Name = "1own.H.Zip",
                                                          .Value = "1020"
                                                      },
                                                      New CustomAltButtonField() With {
                                                          .Name = "1own.H.Country",
                                                          .Value = "Argentina"
                                                      }
                                                  }
                                              },
                                               New CustomAltButtonGroup() With {
                                                  .GroupLabel = "Account 2",
                                                  .Fields = New List(Of CustomAltButtonField) From {
                                                  New CustomAltButtonField() With {
                                                          .Name = "1own.H.Addr123",
                                                          .Value = "3625 Del Amo Blvd"
                                                      },
                                                      New CustomAltButtonField() With {
                                                          .Name = "1own.H.Addr4",
                                                          .Value = ""
                                                      },
                                                      New CustomAltButtonField() With {
                                                          .Name = "1own.H.City",
                                                          .Value = "Torrance"
                                                      },
                                                      New CustomAltButtonField() With {
                                                          .Name = "1own.H.State",
                                                          .Value = "CA"
                                                      },
                                                      New CustomAltButtonField() With {
                                                          .Name = "1own.H.Zip",
                                                          .Value = "90501"
                                                      },
                                                      New CustomAltButtonField() With {
                                                          .Name = "1own.H.Country",
                                                          .Value = "USA"
                                                      }
                                                  }
                                              }
                                          }
}) |
C#
Sample Code
| Code Block | ||
|---|---|---|
| ||
objQFE.AddCustomAltDataButton(new CustomAltButton {
	FieldName = "1own.H.Addr123",
	Title = "Select your Home Address",
	Groups = new List<CustomAltButtonGroup> {
		new CustomAltButtonGroup {
			GroupLabel = "Account 1",
			Fields = new List<CustomAltButtonField> {
				new CustomAltButtonField {
					Name = "1own.H.Addr123",
					Value = "Rivadavia 2134"
				},
				new CustomAltButtonField {
					Name = "1own.H.Addr4",
					Value = "Rincon 20"
				},
				new CustomAltButtonField {
					Name = "1own.H.City",
					Value = "CABA"
				},
				new CustomAltButtonField {
					Name = "1own.H.State",
					Value = "BA"
				},
				new CustomAltButtonField {
					Name = "1own.H.Zip",
					Value = "1020"
				},
				new CustomAltButtonField {
					Name = "1own.H.Country",
					Value = "Argentina"
				}
			}
		},
		new CustomAltButtonGroup {
			GroupLabel = "Account 2",
			Fields = new List<CustomAltButtonField> {
				new CustomAltButtonField {
					Name = "1own.H.Addr123",
					Value = "3625 Del Amo Blvd"
				},
				new CustomAltButtonField {
					Name = "1own.H.Addr4",
					Value = ""
				},
				new CustomAltButtonField {
					Name = "1own.H.City",
					Value = "Torrance"
				},
				new CustomAltButtonField {
					Name = "1own.H.State",
					Value = "CA"
				},
				new CustomAltButtonField {
					Name = "1own.H.Zip",
					Value = "90501"
				},
				new CustomAltButtonField {
					Name = "1own.H.Country",
					Value = "USA"
				}
			}
		}
	}
}); |
In the snippet above, we are setting a custom button that will show two records (Account 1 and Account 2). The user will see a popup after clicking the button with these two records in a drop down list. After selecting one record and clicking 'Add', the underlying fields will be populated accordingly.
User Experience
Here you can see the feature from the user's point of view. The Alt-Button displayed next to the specified field; represented by a blue '+'
Next, the Alt-Button popup will display after clicking the '+' button
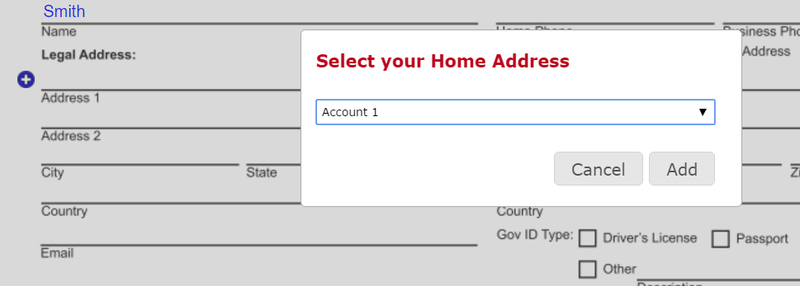
Your different options are available in the Drop Down List. Each will populate the associated fields with differing data sets.
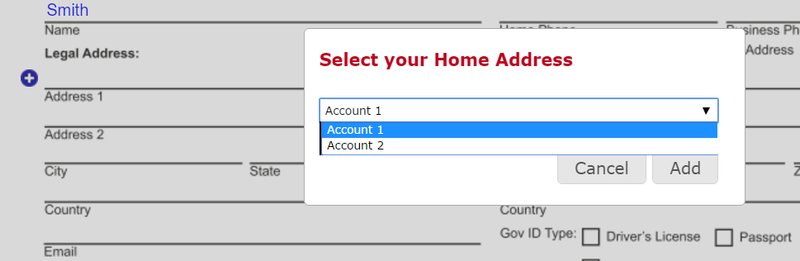
All related fields are populated after selecting a record from the Drop Down List and clicking 'Add' button.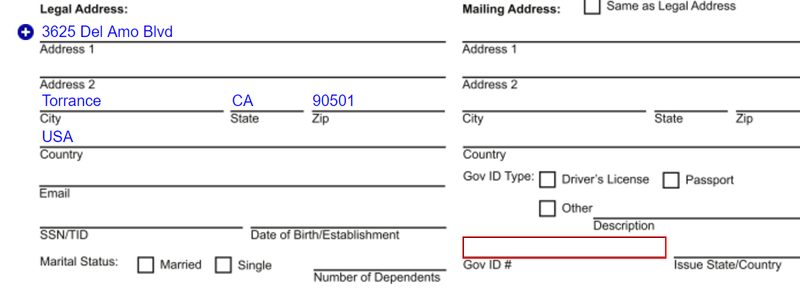 Overload of the method AddCustomAltDataButton
...
Sample of XML structure to implement overloaded method are showed below.
Sample Code
| Code Block | ||
|---|---|---|
| ||
<?xml version="1.0" encoding="UTF-8"?>

<CustomAltButton>
   <FieldName>1own.LName</FieldName>
   <Title>Select your Home Address</Title>
   <Groups>
      <CustomAltButtonGroup>
         <GroupLabel>Account 1</GroupLabel>
         <Fields>
            <CustomAltButtonField>
               <Name>1own.H.Addr123</Name>
               <Value>Rivadavia 2134</Value>
            </CustomAltButtonField>
            <CustomAltButtonField>
               <Name>1own.H.Addr4</Name>
               <Value>Rincon 20</Value>
            </CustomAltButtonField>
            <CustomAltButtonField>
               <Name>1own.H.City</Name>
               <Value>CABA</Value>
            </CustomAltButtonField>
            <CustomAltButtonField>
               <Name>1own.H.State</Name>
               <Value>BA</Value>
            </CustomAltButtonField>
            <CustomAltButtonField>
               <Name>1own.H.Zip</Name>
               <Value>1020</Value>
            </CustomAltButtonField>
            <CustomAltButtonField>
               <Name>1own.H.Country</Name>
               <Value>Argentina</Value>
            </CustomAltButtonField>
         </Fields>
      </CustomAltButtonGroup>
      <CustomAltButtonGroup>
         <GroupLabel>Account 2</GroupLabel>
         <Fields>
            <CustomAltButtonField>
               <Name>1own.H.Addr123</Name>
               <Value>3625 Del Amo Blvd</Value>
            </CustomAltButtonField>
            <CustomAltButtonField>
               <Name>1own.H.Addr4</Name>
               <Value />
            </CustomAltButtonField>
            <CustomAltButtonField>
               <Name>1own.H.City</Name>
               <Value>Torrance</Value>
            </CustomAltButtonField>
            <CustomAltButtonField>
               <Name>1own.H.State</Name>
               <Value>CA</Value>
            </CustomAltButtonField>
            <CustomAltButtonField>
               <Name>1own.H.Zip</Name>
               <Value>90501</Value>
            </CustomAltButtonField>
            <CustomAltButtonField>
               <Name>1own.H.Country</Name>
               <Value>USA</Value>
            </CustomAltButtonField>
         </Fields>
      </CustomAltButtonGroup>
   </Groups>
   <XSpacing>50</XSpacing>
   <YSpacing>0</YSpacing>
</CustomAltButton> |
Sample Use Case
VB.NET
Sample Code
| Code Block | ||
|---|---|---|
| ||
Dim FName As String = "<?xml version=""1.0"" encoding=""UTF-8"" standalone=""yes""?><CustomAltButton><FieldName>1own.FName</FieldName><Title>Select your Home Address</Title><Groups><CustomAltButtonGroup><GroupLabel>Account 1</GroupLabel><Fields><CustomAltButtonField><Name>1own.H.Addr123</Name><Value>Rivadavia 2134</Value></CustomAltButtonField><CustomAltButtonField><Name>1own.H.Addr4</Name><Value>Rincon 20</Value></CustomAltButtonField><CustomAltButtonField><Name>1own.H.City</Name><Value>CABA</Value></CustomAltButtonField><CustomAltButtonField><Name>1own.H.State</Name><Value>BA</Value></CustomAltButtonField><CustomAltButtonField><Name>1own.H.Zip</Name><Value>1020</Value></CustomAltButtonField><CustomAltButtonField><Name>1own.H.Country</Name><Value>Argentina</Value></CustomAltButtonField></Fields></CustomAltButtonGroup></Groups><XSpacing>50</XSpacing><YSpacing>0</YSpacing></CustomAltButton>" Dim LName As String = "<?xml version=""1.0"" encoding=""UTF-8"" standalone=""yes""?><CustomAltButton><FieldName>1own.LName</FieldName><Title>Select your Phone and</Title><Groups><CustomAltButtonGroup><GroupLabel>Account 1</GroupLabel><Fields><CustomAltButtonField><Name>1own.H.Phone</Name><Value>34346867</Value></CustomAltButtonField></Fields></CustomAltButtonGroup></Groups><XSpacing>50</XSpacing><YSpacing>0</YSpacing></CustomAltButton>" objQFE.AddCustomAltDataButton(FName, LName) |
...
| Code Block | ||
|---|---|---|
| ||
string FName = "<?xml version=\"1.0\" encoding=\"UTF-8\" standalone=\"yes\"?><CustomAltButton><FieldName>1own.FName</FieldName><Title>Select your Home Address</Title><Groups><CustomAltButtonGroup><GroupLabel>Account 1</GroupLabel><Fields><CustomAltButtonField><Name>1own.H.Addr123</Name><Value>Rivadavia 2134</Value></CustomAltButtonField><CustomAltButtonField><Name>1own.H.Addr4</Name><Value>Rincon 20</Value></CustomAltButtonField><CustomAltButtonField><Name>1own.H.City</Name><Value>CABA</Value></CustomAltButtonField><CustomAltButtonField><Name>1own.H.State</Name><Value>BA</Value></CustomAltButtonField><CustomAltButtonField><Name>1own.H.Zip</Name><Value>1020</Value></CustomAltButtonField><CustomAltButtonField><Name>1own.H.Country</Name><Value>Argentina</Value></CustomAltButtonField></Fields></CustomAltButtonGroup></Groups><XSpacing>50</XSpacing><YSpacing>0</YSpacing></CustomAltButton>"; string LName = "<?xml version=\"1.0\" encoding=\"UTF-8\" standalone=\"yes\"?><CustomAltButton><FieldName>1own.LName</FieldName><Title>Select your Phone and</Title><Groups><CustomAltButtonGroup><GroupLabel>Account 1</GroupLabel><Fields><CustomAltButtonField><Name>1own.H.Phone</Name><Value>34346867</Value></CustomAltButtonField></Fields></CustomAltButtonGroup></Groups><XSpacing>50</XSpacing><YSpacing>0</YSpacing></CustomAltButton>"; objQFE.AddCustomAltDataButton(FName, LName); |
Configuring Default Alternative Data Buttons
Default Alternate Alternative Data Buttons display when data is provided to the form and is available for selection, and are displayed by default. If you want to suppress Default Alternate Alternative Data Buttons from appearing, set the HTMLShowAltDataButtons property to FALSE. Note that when the SetFormReadOnly property is set to TRUE, Default Alt Data Buttons will not display.
...
Alternative Data Button Record Blocks
Below is a list of the record blocks that are available in Alternate Alternative Data Buttons
Data Block | Included Base Fields |
Contact Name | FullName Prefix FName MName LName Suffix |
Social Security Number | SSN TaxID EmpTaxID |
Address | FullAddr Addr123 CityStateZip Addr1 Addr2 Addr3 Addr4 City State Zip Country County ForeignRoute |
Phone | Phone Fax Mobile Pager Other |
Identification | ID IDCountry IDState IDExpire IDIssueDate IDCopied IDType IDTypeOther IDVerified IDVerifiedNotes IDVerifyMethod |
Representative Numbers | RepNumber RepNumber2 RepNumber3 RepNumber4 RepNumber5 RepNumber6 RepNumber7 RepNumber8 RepNumber9 RepNumber10 RepNumber11 RepNumber12 RepNumber13 RepNumber14 RepNumber15 RepLicNum RepLicNum1 RepLicNum2 RepLicNum3 RepLicNum4 RepLicNum5 RepLicNum6 RepLicNum7 RepLicNum8 RepLicNum10 RepLicNum9 RepLicNum11 RepLicNum12 RepLicNum13 RepLicNum14 |
How To Add Additional Default
...
Alternative Data Button Records
To add records to the alternate alternative data buttons that are not being used to prefill other roles on the form, there is a parent field name that is reserved for up to 20 different alternate records. Use the parent name "##altclient" in front of any fields you want to prefill with the "##" being replaced by an instance number between 1 and 20. In other words, you can add up to 20 altclient records to the form with any base fields that are used in Default Alternate Alternative Data Buttons (name, address, phone, etc.). For example:
Sample Alternate Client Record 1
Sample Code
| Code Block | ||
|---|---|---|
| ||
objQFE.AddFieldToForm("1altclient.FName", _
"Henry", _
QuikFormsEngine.QFD.FieldReadOnly.Read_Only, _
QuikFormsEngine.QFD.FieldVisibility.Visible)
objQFE.AddFieldToForm("1altclient.LName", _
"Ford", _
QuikFormsEngine.QFD.FieldReadOnly.Read_Only, _
QuikFormsEngine.QFD.FieldVisibility.Visible) |
Sample Alternate Client Record 2
Sample Code
| Code Block | ||
|---|---|---|
| ||
objQFE.AddFieldToForm("2altclient.FName", _
"Josh", _
QuikFormsEngine.QFD.FieldReadOnly.Read_Only, _
QuikFormsEngine.QFD.FieldVisibility.Visible)
objQFE.AddFieldToForm("2altclient.LName", _
"Mandel", _
QuikFormsEngine.QFD.FieldReadOnly.Read_Only, _
QuikFormsEngine.QFD.FieldVisibility.Visible) |
When the Execute method runs, the Quik! Forms Engine will look for any fields added that have a parent field name of "altclient" between 1 and 20 and treat them like any other client record. The only difference is that forms are not designed with fields that start with "##altclient" as a parent field so these records will never prefill the form. The main reason to use "altclient" as the parent name is to ensure your alternate records are calculated like any other field (i.e. "1altclient.FullName" will be created automatically based on the values for "1altclient.FName" + "1altclient.MName" + "1altclient.LName").
NOTE: If you need to add more than 20 alternative data records to the form, you can use any parent field naming convention that is not already in use (e.g. "21alt" or "record4") but these records will not be output to the form with any calculated values, just the values you supply.