![]()
DocuSign E-Signature Pop-Up
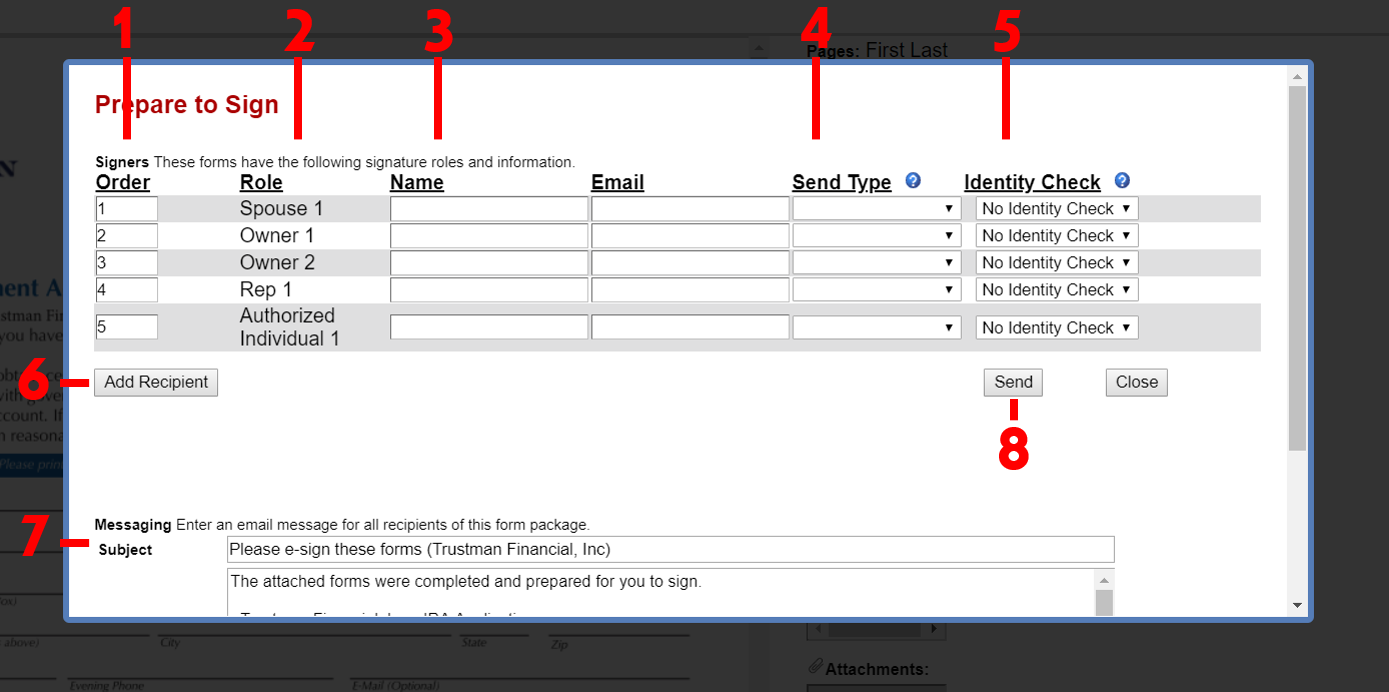
To implement the DocuSign pop-up, configure the Sign button to show in the Quik! HTML Viewer. When a user clicks on the button, the pop-up modal will display over the form interface. As a customer, you have the ability to limit what is displayed in the pop-up, what is set as read-only in the pop-up, and even skip the pop-up altogether. Some of the parts of the e-sign pop-up are described below:
- Order: This field determines the order in which signers will receive the email from DocuSign with the link to the form for e-signature. The default signing order for roles can be found here. Users can manually change the order for any transaction by changing the numbers for each row, or by overriding the order via API. The final order is simply determined from lowest number to highest.
- Role: The roles listed here are determined by which roles have been assigned a signature field on the form itself. They cannot be changed.
- Name/Email: Name and Email will be automatically pre-filled onto the pop-up with the information entered on the form itself, and can be edited as needed. The email entered here is the email to which the DocuSign envelope link will be sent to. Note that users only need to enter the name and email for people they actually need an e-signature for. Rows can be left blank if no signature is required for a given transaction.
- Send Type: Choose a DocuSign Send Type for each recipient here. Send Type determines what category of recipient each person is. The most commonly used Send Type is EmailToSign, which enables a recipient to simply receive the form via email to e-sign it. Send Type has the following values:
EmailToSign
SendCopy
InPersonSigner
Agent
CertifiedDeliveries
EditorChoosing a sign type of none (blank drop-down option) removes the recipient from the signing process. You have the ability to hide as many of the Send Type options as you'd like in your configuration. For more information on what each DocuSign Send Type is, please see DocuSign documentation on this topic.
- Identity Check: Choose a DocuSign Identity Check for each recipient here. Identity Check is an optional setting that you can use to confirm the identity of the signer for added security. Identity Check has the following values:
ID Check
SMS (Text)
Phone
Live ID
Facebook
Linkedin
Google
Salesforce
Twitter
Yahoo
OpenID
You have the ability to hide as many Identity Check options as you'd like in your configuration. For more information on what each DocuSign Identity Check option is, please see DocuSign documentation on this topic. - Add Recipient: Click this button to send the form to another recipient to simply view the form. They will not have the ability to sign the form with DocuSign e-signature-- only view it in DocuSign.
- Subject/Message: This is the subject and message body of the email that each recipient will receive from DocuSign. You can customize both, or simply use the default language.
The default Subject text is the following:
Please e-sign these forms (<form dealer name>)
The default Message text is the following:The attached forms were completed and prepared for you to sign.
<list of form names in current form package>
Please sign these forms by clicking the link.
<name>
(<Form View ID>)
- Send: When users are finished configuring all recipients and settings, they click the Send button as the last step, to begin the e-sign process. The back-end processes that fire upon clicking the Send button are dependent on which of the three implementation models you have implemented. After clicking Send, users can close the E-Sign Pop-Up.
![]()
For help regarding Quik! Forms and the Quik! API
Email: support@quikforms.com | Phone: (877) 456-QUIK