![]()
Self Service Model (Legacy QFE 5.4)
Self-Service Integration refers to customers or partners who typically represent multiple users and want the ability to work directly with the e-sign vendor's APIs. In this scenario, Quik! will provide the customer with the form as a PDF, all the relevant XML data needed by the vendor and any other data. The customer will then submit this information through the e-sign vendor's API to fully control the signature process. This method enables customers to use their own workflows and integrations with e-sign vendors and to eliminate the need to further rely on Quik! to retrieve signature data and documents.
Process Flow
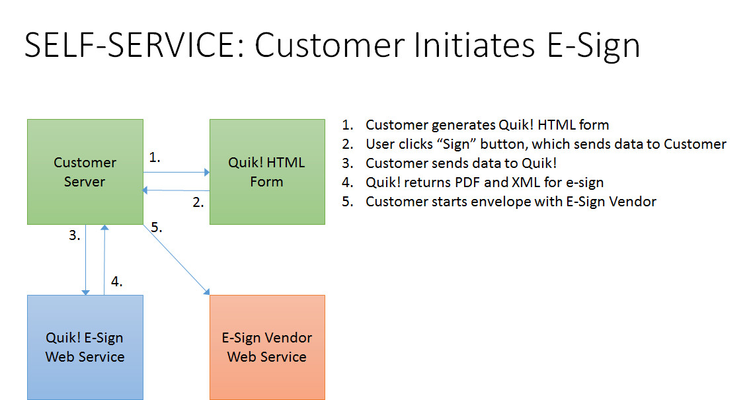
The above graphic shows the basic architecture of how a self-service transaction works. Quik! enables the transaction in two ways:
- The Quik! HTML Form will send the form data back to the customer's web server to start the e-sign process with Quik!.
- The customer will use the turnkey web service designed by Quik! (QuikESignTransportWS), or build their own web service, to capture the form data posted by the user when they click the sign button and to pass that info to the Quik! E-Sign Web Service that returns the PDF and XML form data.
Configure the QuikESignTransport Web Service
The QuikESignTransport web service is included in the software zip file as "QuikESignTransport.zip". This turnkey web service should be installed on your .NET web server running IIS 7.0 or higher and given its own application pool. The project is written in C-sharp and all source code is included so you can make modifications and incorporate it into your workflow.
NOTE: This project will only prepare the data necessary to create a DocuSign envelope including the PDF and XML file to submit to DocuSign.
Configure the web.config File
Open the web.config file in this project and modify the <appSettings> section.
<appSettings>
<add key="strAPIAccountId" value="YOUR DOCUSIGN API ACCOUNT ID"/>
<add key="strAPIUserName" value="YOUR DOCUSIGN API USERNAME"/>
<add key="strUserPassword" value="YOUR DOCUSIGN API PASSWORD"/>
<add key="strAPIUrl" value="https://demo.docusign.net/api/3.0/api.asmx"/> <!--Change this to the production API (https://www.docusign.net/api/3.0/api.asmx) once certified by Docusign IF you modify this project. Otherwise, use the production URL now.-->
<add key="SupportEmail" value ="YOUR SUPPORT EMAIL ADDRESS"/>
<add key="SupportPhone" value ="YOUR SUPPORT PHONE NUMBER"/>
</appSettings>
Enter your values in each appSetting key per the key attributes described below.
NOTE: You must set up a DocuSign API key on your account to use DocuSign!
Keys
Property | Description |
strAPIAccountId | Enter your DocuSign account ID (found in your DocuSign account in the API screen) |
strAPIUserName | Enter your DocuSign username (found in your DocuSign account in the API screen) which has the naming convention of [API-Key-Value]email.com: [########################-############]email@email.com |
strUserPassword | Enter your DocuSign password (found in your DocuSign account in the API screen) |
strAPIUrl | The default demo URL should be used during development and changed according to instructions from DocuSign upon approval and go-live. |
SupportEmail | Enter your company's support email address for any issues that arise from using the system. |
SupportPhone | Enter your company's support phone number for any issues that arise from using the system. |
Client Settings in Web.Config
When you're certified with DocuSign and ready to go live, be sure to change the endpoint URLs to the appropriate production URLs as indicated by DocuSign's documentation.
NOTE: The sample production URLs below may not be the ones you end up using – be sure to read the documentation from DocuSign.
<client>
<endpoint address="https://demo.docusign.net/api/3.0/credential.asmx" binding="basicHttpBinding" bindingConfiguration="CredentialSoap" contract="CredentialService.CredentialSoap" name="CredentialSoap"/>
<!--Change this to the production API (https://www.docusign.net/api/3.0/credential.asmx) once certified by Docusign IF you modify this project. Otherwise, use the production URL now.-->
<endpoint address="https://demo.docusign.net/api/3.0/api.asmx" binding="basicHttpBinding" bindingConfiguration="APIServiceSoap" contract="APIService.APIServiceSoap" name="APIServiceSoap"/>
<!--Change this to the production API (https://www.docusign.net/api/3.0/api.asmx) once certified by Docusign IF you modify this project. Otherwise, use the production URL now.-->
</client>
Creating Envelopes with DocuSign
The QuikESignTransport web service is designed to create envelopes with DocuSign, but there are two different ways you can create envelopes:
- Use the QuikESignTransport web service with your DocuSign credentials to send the data and document to DocuSign and to create the envelope immediately.
- Use the QuikESignTransport web service to call Quik! and retrieve the data and document to send to DocuSign but build your own program to call the DocuSign API to start the envelope.
Use Quik! To Send to DocuSign
By default, when you run the QuikESignTransport web service an envelope will be created in DocuSign automatically. It is then up to you to poll for status using the EnvelopeID returned by the web service and to download the final document.
It is important that you modify the QuikESignTransport to do something with the EnvelopeID that is returned. See line 161 in the QuikSignTransport.aspx.cs file for the EnvelopeID.
Download this project on the Downloads page.
Build Your Own DocuSign API Calls
If you are building a system that will handle all the API calls to DocuSign, then you'll only use the QuikESignTransport web service to prepare and retrieve a final PDF of the forms and external documents, plus the fully-prepared XML file needed by DocuSign. You will want to then modify line 161 in the QuikSignTransport.aspx.cs file to NOT call DocuSign's envelope creation API. This is the point in the code where you will modify the process to do something else (e.g. hand off the returned PDF and XML to another process).
The following c-sharp variables contain the PDF and XML data that you need to perform your own work.
- Byte[] pdfBytes – (QuikSignTransport.aspx.cs line 154) contains the byte stream of the PDF returned by Quik!, including the forms and any external documents, arranged in the order specified when the QuikFormsEngine software was run.
- string XML – (QuikSignTransport.aspx.cs line 156) contains the raw XML returned by the Quik! server which contains the envelope data formatted to work with DocuSign.
NOTE: Any modifications to the PDF and XML are at your own risk to ensure it conforms to DocuSign's API.
Quik!'s Docusign API Web Service
If you plan to collect your own envelope information and call the Quik! web service for Docusign directly, then use this URL. There are two methods – one returns XML and the other JSON formatted data.
Get Docusign Data - https://websvcs.quikforms.com/docusign/esignwsversion/5400/GetDocuSignData.asmx
Working With Non-Signable Forms
If you need to retrieve a PDF form using the DocuSign web service and no signature fields are on the form you will need to pass an empty JSON value (i.e. "[]") in the SignLocations parameter for the GetDocusignResources method of the GetDocuSignData.asmx web service.
![]()
For help regarding Quik! Forms and the Quik! API
Email: support@quikforms.com | Phone: (877) 456-QUIK