Background
This SSO service is designed for a user to be set up on a customer's existing Quik! account, with automatic user registration if the user does not exist.
What is SSO (Single Sign-on) Authentication?
Single-Sign-On (SSO) enables a user from one application to automatically log in to another application without any manual intervention, and often without even knowing their credentials. Because users are managed and authenticated by customer systems (e.g. Active Directory) it's easier on users to use SSO with Quik! than to force users to know, remember and use their own private credentials.
Quik! SSO uses SAML (2.0). The IdP is the Identity Provider (e.g. SalesForce) who has already authenticated the user's identity and wants Quik! to accept that user's authentication in lieu of doing our own authentication. The mechanism that enables Quik! to trust the IdP is that customers have set up their encryption certificate's public key with Quik! and Quik! can use that key to verify their encrypted requests with that key (the assumption is that the IdP is the only one with the private key that is used to encrypt the request). Steps on how to get started with SSO into the Quik! App can be found at the bottom of this page.
Quik! App SSO Process
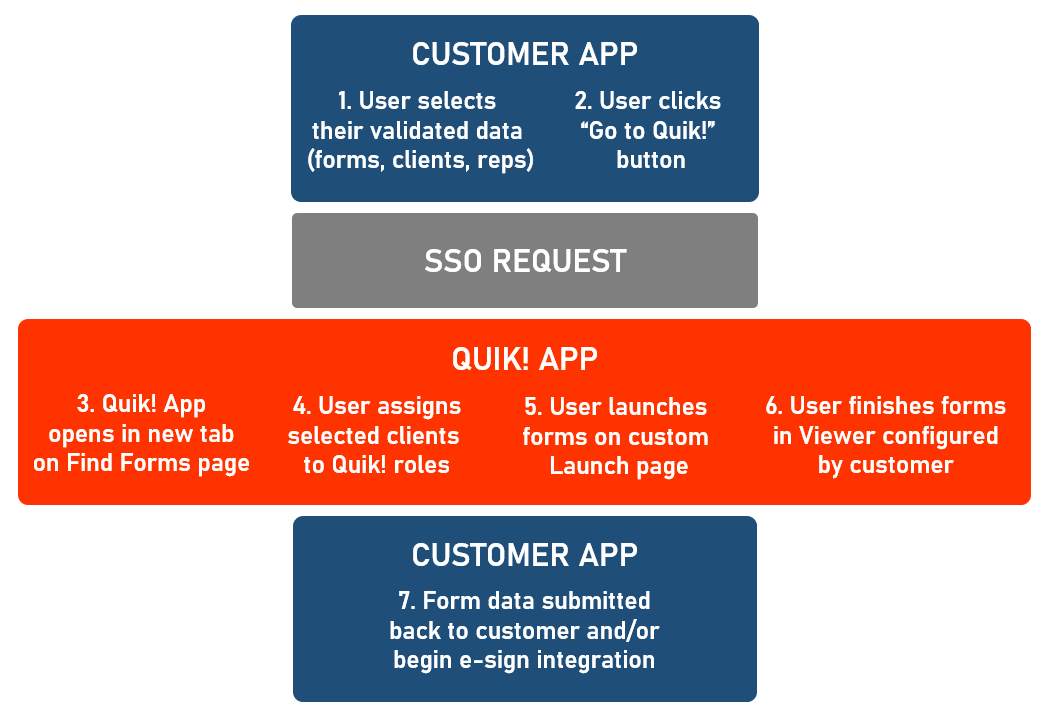
The overall flow follows these steps:
- User originates outside of Quik! in a customer or partner 3rd party system/platform/application
- User clicks a link/button/event to go to Quik!
- 3rd party system initiates an SSO Request and gets back a redirect to Quik!
- The Quik! App opens in a new tab for the user
- Now that the user is logged into Quik!, they can begin generating forms
- The landing page may be variable depending on parameters passed in the SSO request
- User will need to have forms selected or to find the forms they want to use
- If one or more FormIDs are passed in the SSO then the shopping cart will prefill with those forms
- The form search results will display all Form IDs that were passed in SSO
- If FormGroupIDs were passed in SSO then the form bundle view is displayed with those Form GroupIDs pre-selected
- The user will assign client records to the available roles on the selected forms
- The CRM choice may be disabled by request in the SSO so the user cannot select any other CRMs
- The client search may be hidden or disabled by request in the SSO so the user cannot add other records
- Any Client IDs that were passed in the SSO will display as a list of clients in the client search results
- If the Owner 1 record is pre-assigned in the SSO then a client will be pre-assign to that role on the Choose Clients screen
- User moves to the Launch page
- The rep drop-down list may be locked by request in the SSO
- The e-sign drop-down may be locked by request in the SSO
- User launches the forms
- The Quik! Form Viewer can be configured to enable buttons for Submit, Save, E-Sign or Email
- The customer may implement the e-sign meta data web service
- The customer's system may process the form data that was submitted and/or integrate with the e-sign vendor
SAML
SAML is a protocol and methodology for authenticating users. It was built in .NET as a standalone endpoint and code-base, leveraging ComponentSpace's tools for reading and interpreting SAML XML files. The Quik! SAML project validates and accepts an incoming SAML request from an Identity Provider (IdP). The request is used to authenticate a user, onboard new users, pass data to Quik!, pass data to the Quik! App to control the user experience, and pass data to forms to become part of the form payload that becomes part of the transaction (i.e. hidden data, meta data, etc.).
SAML Project Details
Endpoint
The following production endpoint is to be used for all production SAML requests:
https://websvcs.quikforms.com/REST/QuikSAML/v1000/QuikSAML/SAMLSSO
The following UAT pre-production endpoint can be used for testing prior to implementing in a production environment:
https://uatwebsvcs.quikforms.com/REST/QuikSAML/v1000/QuikSAML/SAMLSSO
Attributes
The table below lists all possible attributes that can be included in a Quik! SAML request (SAML Assertation XML). Yellow rows represent future attributes that do not yet exist, but are in the Quik! development roadmap.
| Category | Name | Description | Data Type | Required? |
|---|---|---|---|---|
| Application Data | ApplicationID | The Application ID at Quik! ALL CUSTOMERS MUST USE VALUE "36" FOR ApplicationID | string | YES |
| Application Data | AudienceRestriction | Value that specifies who the assertion is for ALL CUSTOMERS MUST USE VALUE "ServiceProvider" FOR AudienceRestriction | string | YES |
| Quik! Account Data | CustomerID | Quik! CustomerID assigned to the customer's account | string | YES |
| Quik! Account Data | CustomerUserID | Customer's unique UserID from their internal system of record | string | YES |
| Application Control | TimeoutRedirectURL | A URL to send the user to when their logged in session expires or is logged out | string | YES |
| Quik! Account Data | UserFirstName | User's first name | string | YES |
| Quik! Account Data | UserLastName | User's last name | string | YES |
| Quik! Account Data | UserEmail | User's email address | string | YES |
| Quik! Account Data | Username | User's username - if not provided, Quik! will generate a Username for the user | string | NO |
| Quik! Account Data | Password | If provided, user's password will be hashed and stored | string | NO |
| Quik! Account Data | CustomerUserType | Type of user being logged in (e.g Advisor, HomeOffice, etc.) | string | NO |
| Application Data | BrokerDealerID | The Broker/Dealer's internal ID used with API calls or e-sign | string | NO |
| Application Data | CustomerClientId | The ClientID to assign to Owner1 role | string | NO |
| Application Data | CustomerAccountId | The account ID to assign to Account 1 role | string | NO |
| Application Data | FormIDList | List of FormIDs to add to the shopping cart | csv | NO |
| Application Data | ClientIDList | List of Client IDs to lookup from the connected CRM | csv | NO |
| Application Data | RepIDList | List of Client IDs to lookup sales rep records from the connected CRM | csv | NO |
| Application Data | Rep1RecordID | The record ID to assign to Rep 1 role | string | NO |
| Application Data | RepNumberList | List of rep numbers to show in the launch screen of the Quik! App | csv | NO |
| Application Data | Transactions | List of transaction data objects like a tradeblotter, orders, etc. Must contain a root object called “transactions” which will store an array of objects with the following attributes:
Example: | json string | NO |
| Application Data | {Quik! Field Name} and {Value} | Any Quik! full field name and value to prefill onto the form | string | NO |
| E-Sign Meta Data | ClientCode | The user's client ID | string | NO |
| E-Sign Meta Data | AccountCode | The customer's account ID | string | NO |
| E-Sign Meta Data | RepCode | The customer's sales rep ID | string | NO |
| E-Sign Meta Data | FirmCode | The customer's firm (broker/dealer ID) | string | NO |
| E-Sign Meta Data | ClientTransNumber | The customer's transaction number (numeric integer values only) | number | NO |
| E-Sign Meta Data | ClientTransNumber2 | The customer's transaction number (numeric integer values only) - number 2 | number | NO |
| E-Sign Meta Data | ClientTransNumber3 | The customer's transaction number (numeric integer values only) - number 3 | number | NO |
| E-Sign Meta Data | ClientTransNumber4 | The customer's transaction number (numeric integer values only) - number 4 | number | NO |
| E-Sign Meta Data | ClientTransCode | The customer's transaction code | string | NO |
| E-Sign Meta Data | ClientTransCodeType | The description if any of the ClientTransCode so customer knows what the data represents | string | NO |
| E-Sign Meta Data | ClientTransCode2 | The customer's transaction code - number 2 | string | NO |
| E-Sign Meta Data | ClientTransCode2Type | The description if any of the ClientTransCode2 so the customer knows what the data represents | string | NO |
| E-Sign Meta Data | ClientTransCode3 | The customer's transaction code - number 3 | string | NO |
| E-Sign Meta Data | ClientTransCode3Type | The description if any of the ClientTransCode3 so the customer knows what the data represents | string | NO |
| E-Sign Meta Data | ClientTransCode4 | The customer's transaction code - number 4 | string | NO |
| E-Sign Meta Data | ClientTransCode4Type | The description if any of the ClientTransCode4 so the customer knows what the data represents | string | NO |
| E-Sign Meta Data | ClientTransMetaData | Any extra text the customer wants to pass through the meta data service (up to 8000 characters) | string | NO |
| Application Control | EnableESign | Turns on or off the e-sign feature for the logged in session of the Quik! App | boolean | NO |
| Application Control | EnableClientSearch | Flag to hide/disable the client search page in the Quik! App | boolean | NO |
| QFE Properties | LockPrefilledFields | If TRUE, sets the prefilled fields as read-only on the form | boolean | NO |
| QFE Properties | ESignCallbackURL | Sets the value of the e-sign Callback URL | string | NO |
| QFE Properties | SubmitFormOn | If TRUE, shows the Submit button in the Quik! Form Viewer | boolean | NO |
| QFE Properties | SubmitURL | Sets the value of the Submit button URL (location where submitted form data will be sent) | string | NO |
| Application Control | AfterLoginDisplayPage | The first view to display after SSO login (e.g. Home, Forms, Clients, Launch, FormViewer) | string | NO |
| Application Control | DatabaseConnectionID | Quik! QDBC Connection ID to use when requesting client records, if none then whatever connection exists on the account is used | string | NO |
| Application Control | LockAssignedRoles | Flag to allow user to change pre-assigned roles | boolean | NO |
| Application Control | LockRepChoice | Flag to disable/enable the rep drop-down in the Launch page | boolean | NO |
| Application Control | ESignConnectionName | Determines which e-sign connection user can access by passing the ESign connection name | string | NO |
| Application Control | LockESignChoice | Flag to disable/enable e-sign drop-down in the Launch page | boolean | NO |
| QFE Properties | LockAllFields | If TRUE, sets all fields as read-only on the form | boolean | NO |
| Application Data | FormGroupIDList | List of FormGroupIDs to get the related forms to add to the shopping cart | csv | NO |
Getting Started
Follow the steps below to set up SSO to the Quik! App:
- Before you begin, make sure your organization has an active Quik! App account
- Contact the Quik! team (support@quikforms.com) or your Quik! sales contact and provide the following information:
- Your Quik! Customer ID (ask Quik! if you do not know your customer ID)
- Your X.509 Cerificate. This maps to our CertificateBase64 attribute.
- Your EntityID aka Audience URI value which must be a unique identifier. This maps to our Name attribute.
- The Quik! team will enable your account for SSO (this can be done same-day)
- You must build infrastructure and UI elements in your environment that support some sort of "Send to Quik!" button for users to enter the Quik! App with a SAML request. See the SAML Project Details above for more information on which data points to send to Quik! in the SSO event.
- Quik! recommends that you test your SSO implementation with the pre-production SAML endpoint referenced above.
- Once testing is complete, you can use the production SAML endpoint referenced above and begin the SSO process for users in your production environment.