![]()
Configuring The Alt Button
- Chad Bingham (Unlicensed)
There is a property in the QuikFormsEngine class called EnableCustomAltButtons that enables/disables the feature. By default, it is on (EnableCustomAltButtons = true).
Examples
Suppose we want to add a custom button next to the field 1own.H.Addr123, that will allow the user to populate all Home Address related fields. And let's say the related fields are:
- 1own.H.Addr123
- 1own.H.Addr4
- 1own.H.City
- 1own.H.State
- 1own.H.Zip
- 1own.H.Country
The way to accomplish this is by calling the QuikFormsEngine's AddCustomAltDataButton method, and passing a CustomAltButton object that will be described below. Here's a sample code snippet:
VB.NET
objQFE.AddCustomAltDataButton(New CustomAltButton() With {
                                          .FieldName = "1own.H.Addr123",
                                          .Title = "Select your Home Address",
                                          .Groups = New List(Of CustomAltButtonGroup) From {
                                               New CustomAltButtonGroup() With {
                                                  .GroupLabel = "Account 1",
                                                  .Fields = New List(Of CustomAltButtonField) From {
                                                  New CustomAltButtonField() With {
                                                          .Name = "1own.H.Addr123",
                                                          .Value = "Rivadavia 2134"
                                                      },
                                                      New CustomAltButtonField() With {
                                                          .Name = "1own.H.Addr4",
                                                          .Value = "Rincon 20"
                                                      },
                                                      New CustomAltButtonField() With {
                                                          .Name = "1own.H.City",
                                                          .Value = "CABA"
                                                      },
                                                      New CustomAltButtonField() With {
                                                          .Name = "1own.H.State",
                                                          .Value = "BA"
                                                      },
                                                      New CustomAltButtonField() With {
                                                          .Name = "1own.H.Zip",
                                                          .Value = "1020"
                                                      },
                                                      New CustomAltButtonField() With {
                                                          .Name = "1own.H.Country",
                                                          .Value = "Argentina"
                                                      }
                                                  }
                                              },
                                               New CustomAltButtonGroup() With {
                                                  .GroupLabel = "Account 2",
                                                  .Fields = New List(Of CustomAltButtonField) From {
                                                  New CustomAltButtonField() With {
                                                          .Name = "1own.H.Addr123",
                                                          .Value = "3625 Del Amo Blvd"
                                                      },
                                                      New CustomAltButtonField() With {
                                                          .Name = "1own.H.Addr4",
                                                          .Value = ""
                                                      },
                                                      New CustomAltButtonField() With {
                                                          .Name = "1own.H.City",
                                                          .Value = "Torrance"
                                                      },
                                                      New CustomAltButtonField() With {
                                                          .Name = "1own.H.State",
                                                          .Value = "CA"
                                                      },
                                                      New CustomAltButtonField() With {
                                                          .Name = "1own.H.Zip",
                                                          .Value = "90501"
                                                      },
                                                      New CustomAltButtonField() With {
                                                          .Name = "1own.H.Country",
                                                          .Value = "USA"
                                                      }
                                                  }
                                              }
                                          }
                                      })
C#
objQFE.AddCustomAltDataButton(new CustomAltButton {
	FieldName = "1own.H.Addr123",
	Title = "Select your Home Address",
	Groups = new List<CustomAltButtonGroup> {
		new CustomAltButtonGroup {
			GroupLabel = "Account 1",
			Fields = new List<CustomAltButtonField> {
				new CustomAltButtonField {
					Name = "1own.H.Addr123",
					Value = "Rivadavia 2134"
				},
				new CustomAltButtonField {
					Name = "1own.H.Addr4",
					Value = "Rincon 20"
				},
				new CustomAltButtonField {
					Name = "1own.H.City",
					Value = "CABA"
				},
				new CustomAltButtonField {
					Name = "1own.H.State",
					Value = "BA"
				},
				new CustomAltButtonField {
					Name = "1own.H.Zip",
					Value = "1020"
				},
				new CustomAltButtonField {
					Name = "1own.H.Country",
					Value = "Argentina"
				}
			}
		},
		new CustomAltButtonGroup {
			GroupLabel = "Account 2",
			Fields = new List<CustomAltButtonField> {
				new CustomAltButtonField {
					Name = "1own.H.Addr123",
					Value = "3625 Del Amo Blvd"
				},
				new CustomAltButtonField {
					Name = "1own.H.Addr4",
					Value = ""
				},
				new CustomAltButtonField {
					Name = "1own.H.City",
					Value = "Torrance"
				},
				new CustomAltButtonField {
					Name = "1own.H.State",
					Value = "CA"
				},
				new CustomAltButtonField {
					Name = "1own.H.Zip",
					Value = "90501"
				},
				new CustomAltButtonField {
					Name = "1own.H.Country",
					Value = "USA"
				}
			}
		}
	}
});
In the snippet above, we are setting a custom button that will show two records (Account 1 and Account 2). The user will see a popup after clicking the button with these two records in a drop down list. After selecting one record and clicking 'Add', the underlying fields will be populated accordingly.
Objects being involved
| Object Name | Description | Properties |
|---|---|---|
| CustomAltButton | Object passed to the QuikFormsEngine method |
|
| CustomAltButtonGroup | Object that represents an option in the popup's DropDownList. The group contains all data related to one record. |
|
| CustomAltButtonField | Object that contains data related to a single field associated to the group |
|
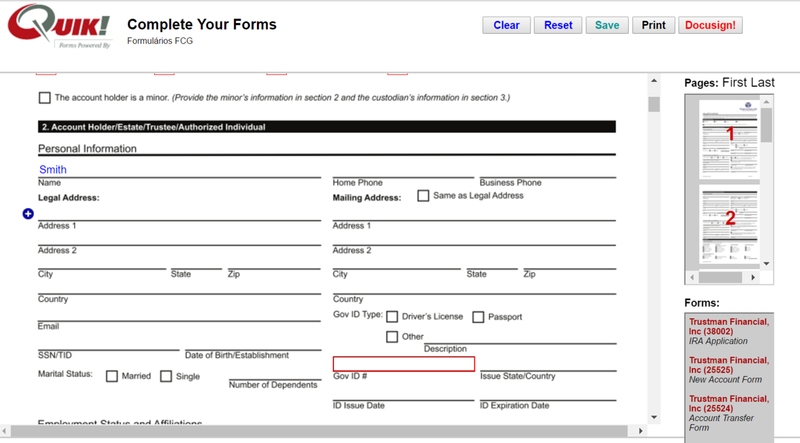
User Experience
- Here you can see the feature from the user's point of view. The Alt-Button displayed next to the specified field; represented by a blue '+'
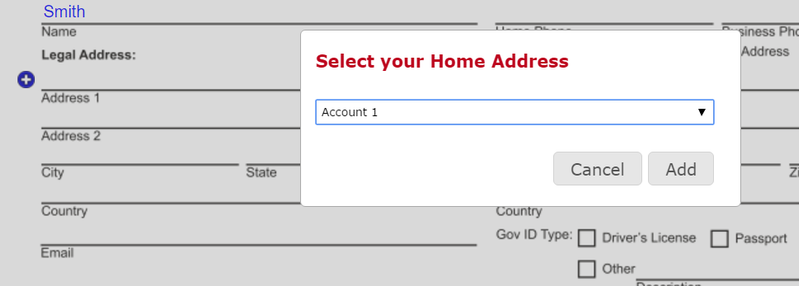
- Next, the Alt-Button popup will display after clicking the '+' button
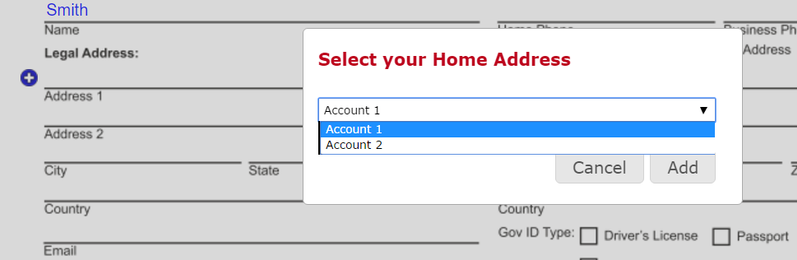
- Your different options are available in the Drop Down List. Each will populate the associated fields with differing data sets.
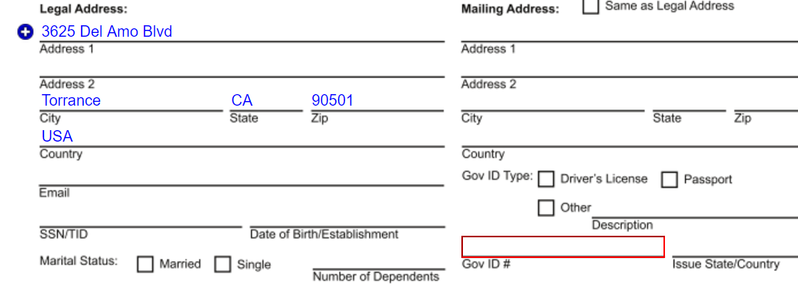
- All related fields are populated after selecting a record from the Drop Down List and clicking 'Add' button.
Related content
![]()
For help regarding Quik! Forms and the Quik! API
Email: support@quikforms.com | Phone: (877) 456-QUIK